origin使用教程 origin如何使用?
Origin是由OriginLab公司出品的较为流行的专业函数绘图软件,据使用过的用户描述,该款软件简单易学、操作灵活,功能十分强大,不管你是用于简单的制图,还是高级的数据分析,这款软件都可以满足你。现在给大家介绍Origin的使用教程。
1、Origin主界面。

2、输入数据获得散点图。在试验中侧得一组数据,只需输入到origin的data对话框中,选中数据,然后点击左下角的Scatter键即可得到散点图,以待进一步处理。

3、连接点获得趋势图。如果只需要将各点以折线连接 起来,则在获得散点图时可直接点击Line+symbol。

4、在散点图的基础上获得趋势线。在坐标中的点上右击“Change Plot to”—“Line +Symbol”。

5、在散点图的基础上获得趋势线。删除趋势线:右击--“Change Plot to”—“Scatter”。

6、在散点图的基础上获得趋势线。如果想获得的不是折线图,而是希望用平滑的曲线表示趋势,则只需在折线基础上进一步加工如下:“双击折线”—“选择Line”------“connect”----- “选择曲线类型”----“Apply”。

7、平滑处理数据。另外一种处理这种只需要表现趋势的图形的方法是平滑。Analysis---Smoothing—FFT Filer。

8、线性拟合。实际应用做多的拟合即是线性拟合。操作如下:Analysis----Fit Linear。

9、线性拟合中的数字参量。y=a*x+b,参数a:斜率,b: 截距,r:相关系数。这些数字参量origin在拟合时就已经计算出来了,显示在窗口的右下方。
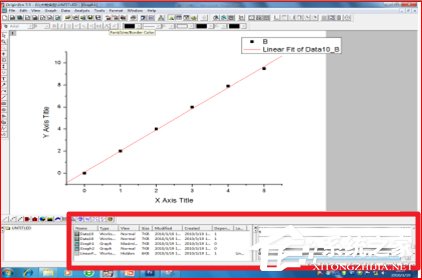
10、在一个坐标上绘制多条曲线。得到第一个图形的拟合曲线,在坐标的左上角处有一个“1”,右击选择“Layer contents”,打开对话框以后在左栏选中你要添加到该图的数据表。

11、在一个坐标上绘制多条曲线。进行相应拟合即可。

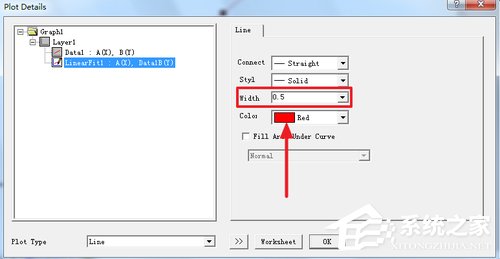
12、图形美化。在线或点上双击后,可以调节点的大小;改变曲线颜色及宽度。
13、图形美化之移动点。不要移动幅度过大造成明显的造假痕迹。

14、图形美化之删除点。

15、图形美化之图形输出。可以复制以后粘贴到Word里,再附上拟合参数。

上面已经将Origin软件详细的使用过程按照步骤写出来了,不会操作的用户可以按照上面的步骤一步一步来进行操作。到此,关于Origin软件的使用教程就介绍到这边了。
{else}Origin是由OriginLab公司出品的较为流行的专业函数绘图软件,据使用过的用户描述,该款软件简单易学、操作灵活,功能十分强大,不管你是用于简单的制图,还是高级的数据分析,这款软件都可以满足你。现在给大家介绍Origin的使用教程。
1、Origin主界面。
2、输入数据获得散点图。在试验中侧得一组数据,只需输入到origin的data对话框中,选中数据,然后点击左下角的Scatter键即可得到散点图,以待进一步处理。
3、连接点获得趋势图。如果只需要将各点以折线连接 起来,则在获得散点图时可直接点击Line+symbol。
4、在散点图的基础上获得趋势线。在坐标中的点上右击“Change Plot to”—“Line +Symbol”。
5、在散点图的基础上获得趋势线。删除趋势线:右击--“Change Plot to”—“Scatter”。
6、在散点图的基础上获得趋势线。如果想获得的不是折线图,而是希望用平滑的曲线表示趋势,则只需在折线基础上进一步加工如下:“双击折线”—“选择Line”------“connect”----- “选择曲线类型”----“Apply”。
7、平滑处理数据。另外一种处理这种只需要表现趋势的图形的方法是平滑。Analysis---Smoothing—FFT Filer。
8、线性拟合。实际应用做多的拟合即是线性拟合。操作如下:Analysis----Fit Linear。
9、线性拟合中的数字参量。y=a*x+b,参数a:斜率,b: 截距,r:相关系数。这些数字参量origin在拟合时就已经计算出来了,显示在窗口的右下方。
10、在一个坐标上绘制多条曲线。得到第一个图形的拟合曲线,在坐标的左上角处有一个“1”,右击选择“Layer contents”,打开对话框以后在左栏选中你要添加到该图的数据表。
11、在一个坐标上绘制多条曲线。进行相应拟合即可。
12、图形美化。在线或点上双击后,可以调节点的大小;改变曲线颜色及宽度。
13、图形美化之移动点。不要移动幅度过大造成明显的造假痕迹。
14、图形美化之删除点。
15、图形美化之图形输出。可以复制以后粘贴到Word里,再附上拟合参数。
上面已经将Origin软件详细的使用过程按照步骤写出来了,不会操作的用户可以按照上面的步骤一步一步来进行操作。到此,关于Origin软件的使用教程就介绍到这边了。