Win11自带的Hyper-V虚拟机怎么使用?
许多用户都知道,在Win10系统中,微软为我们自动配备了虚拟机。而在最新的Windows11操作系统中,同样也拥有,并且如果用户需要在电脑中安装安卓app也需要使用到,下面小编就带着大家一起看看怎么解决这个问题吧!
Win11自带虚拟机使用方法
一、专业版win11
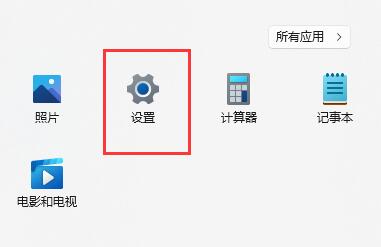
1、首先通过开始菜单,进入“设置”。
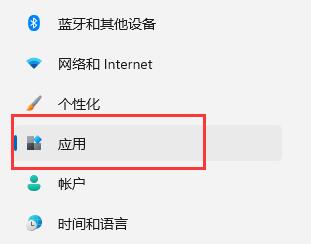
2、在设置中点击左边的“应用”选项。
3、然后在其中打开“可选功能”。

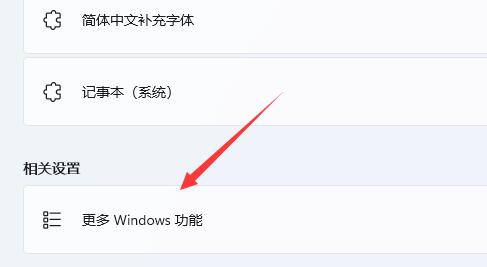
4、在最下方相关设置中打开“更多Windows功能”。
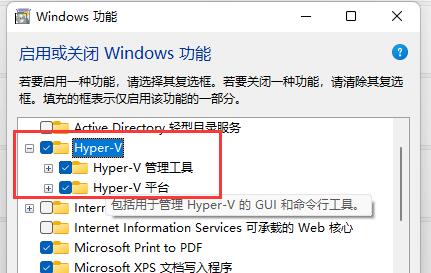
5、在其中勾选开启“Hyper-V”并点击确定保存即可。
二、家庭版win11
1、右键桌面空白处,选择新建一个“文本文档”。
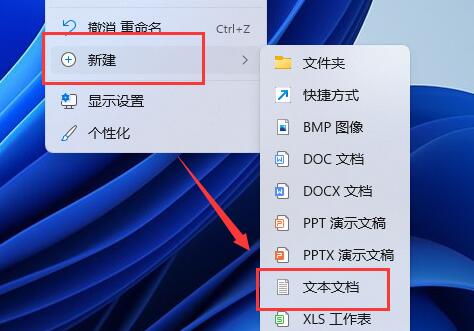
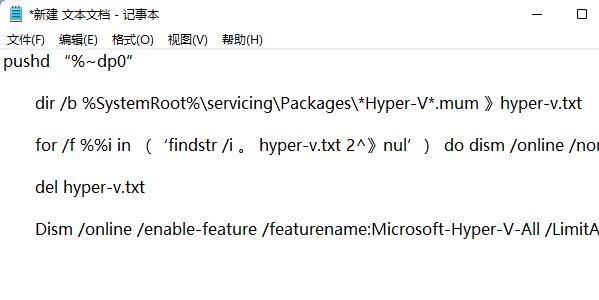
2、在其中输入以下命令。
- 01 pushd “%~dp0”
- 02 dir /b %SystemRoot%\servicing\Packages\*Hyper-V*.mum 》hyper-v.txt
- 03 for /f %%i in (‘findstr /i 。 hyper-v.txt 2^》nul’) do dism /online /norestart /add-package:“%SystemRoot%\servicing\Packages\%%i”
- 04 del hyper-v.txt
- 05 Dism /online /enable-feature /featurename:Microsoft-Hyper-V-All /LimitAccess /ALL
pushd “%~dp0” dir /b %SystemRoot%\servicing\Packages\*Hyper-V*.mum 》hyper-v.txt for /f %%i in (‘findstr /i 。 hyper-v.txt 2^》nul’) do dism /online /norestart /add-package:“%SystemRoot%\servicing\Packages\%%i” del hyper-v.txt Dism /online /enable-feature /featurename:Microsoft-Hyper-V-All /LimitAccess /ALL
3、然后将该文本文档重命名为“Hyper-V.cmd”。
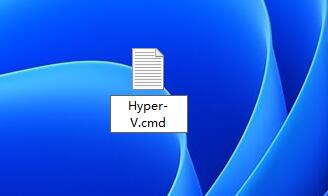
4、修改完成后双击允许该程序就可以了。

许多用户都知道,在Win10系统中,微软为我们自动配备了虚拟机。而在最新的Windows11操作系统中,同样也拥有,并且如果用户需要在电脑中安装安卓app也需要使用到,下面小编就带着大家一起看看怎么解决这个问题吧!
Win11自带虚拟机使用方法
一、专业版win11
1、首先通过开始菜单,进入“设置”。
2、在设置中点击左边的“应用”选项。
3、然后在其中打开“可选功能”。
4、在最下方相关设置中打开“更多Windows功能”。
5、在其中勾选开启“Hyper-V”并点击确定保存即可。
二、家庭版win11
1、右键桌面空白处,选择新建一个“文本文档”。
2、在其中输入以下命令。
- 01 pushd “%~dp0”
- 02 dir /b %SystemRoot%\servicing\Packages\*Hyper-V*.mum 》hyper-v.txt
- 03 for /f %%i in (‘findstr /i 。 hyper-v.txt 2^》nul’) do dism /online /norestart /add-package:“%SystemRoot%\servicing\Packages\%%i”
- 04 del hyper-v.txt
- 05 Dism /online /enable-feature /featurename:Microsoft-Hyper-V-All /LimitAccess /ALL
pushd “%~dp0” dir /b %SystemRoot%\servicing\Packages\*Hyper-V*.mum 》hyper-v.txt for /f %%i in (‘findstr /i 。 hyper-v.txt 2^》nul’) do dism /online /norestart /add-package:“%SystemRoot%\servicing\Packages\%%i” del hyper-v.txt Dism /online /enable-feature /featurename:Microsoft-Hyper-V-All /LimitAccess /ALL
3、然后将该文本文档重命名为“Hyper-V.cmd”。
4、修改完成后双击允许该程序就可以了。
Win11教程最新文章
游戏排行


热点推荐
换一换- Win11不能拖拽文件到任务栏怎么解决?Win11拖拽文件到任务栏的方法
- 有必要装Win11专业工作站版本么?小编为你解答
- Win11右下角WiFi图标不见了怎么显示?Win11右下角WiFi图标找回方法教学
- Win11共享win7打印机提示709怎么办?Win11打印机提示709错误解决方法
- Win11磁盘清理怎么没有了?Win11磁盘清理在哪打开?
- Win11暂停更新点不了怎么办?Win11暂停更新是灰色的如何解决?
- Win11卸载更新在哪?Win11卸载更新的两种方法
- Windows沙盒无法连接网络?Win11中Sandbox沙盒不能联网解决教程
- Win11蓝屏错误代码WHEA_UNCORRECTABLE_ERROR如何解决?
- Win11 双击文件夹弹出属性怎么解决?